Unlock Fluffy Gluten-Free Bread: High-Speed Beating Secret
For years, gluten-free bread has carried a reputation for being dense, crumbly, and a far cry from its wheat-based counterparts. The quest for a truly soft, pliable, and delicious loaf that can hold its own as a sandwich foundation felt like an endless journey for many. But what if we told you the secret to achieving a genuinely
tender high rising gluten free sandwich bread isn't about magical ingredients, but rather a simple, powerful technique in your mixing bowl? Prepare to discover how high-speed beating transforms gluten-free baking, delivering a loaf so fluffy and sliceable, you'll wonder if it's truly gluten-free.
The Gluten-Free Conundrum: Why Structure Matters
Gluten, a protein composite found in wheat and related grains, plays a crucial role in traditional bread making. It forms an elastic network that traps gases produced by yeast, allowing the dough to rise and develop its characteristic chewy texture. When gluten is absent, as it is in gluten-free flours, bakers face a significant challenge: how to create that airy structure without the primary building block. Many early gluten-free recipes compensated with gums and alternative starches, often resulting in loaves that were heavy, quick to stale, and notoriously difficult to slice without crumbling.
The key to replicating that desirable structure lies in understanding what gluten *does* and finding alternative ways to achieve similar results. For too long, the focus was solely on ingredient substitutes. Now, thanks to innovative techniques, we can leverage mechanical processes to introduce the necessary structure, leading to revolutionary results in our gluten-free kitchens.
The Secret Revealed: High-Speed Beating for Superior Structure
The core of our fluffy bread secret lies in the humble stand mixer. Unlike traditional yeast doughs that require gentle kneading to develop gluten, gluten-free batters thrive on vigorous aeration. The method is simple yet profoundly effective: once all your ingredients are combined, the mixture is beaten at high speed for a precise duration, typically around three minutes.
What happens during these critical minutes? The high-speed beating rapidly incorporates a significant amount of air into the thick batter. This injected air serves a vital purpose: it creates a stable cellular structure, effectively taking the place of the missing gluten. Think of it as building countless tiny air pockets that will expand and hold their shape during the rise and bake, much like gluten strands do. This mechanical aeration is what gives gluten-free bread its much-needed lift and helps prevent it from becoming a dense brick.
At the end of the three minutes, don't expect a typical elastic dough. Instead, your batter will have a distinctive appearance and texture: it will resemble a very thick, heavy buttercream icing. It should be noticeably smooth and silky, utterly unlike a traditional yeast dough. If you rub a bit between your fingers, it will feel incredibly sticky, with a slight grittiness from the flours, but the overall consistency will be thick and cohesive. This unique batter consistency is a clear indicator that you're on the right track to achieving a truly
tender high rising gluten free sandwich loaf, mirroring the light texture often found in store-bought gluten-free varieties, but with homemade freshness and flavor.
Mastering the Rise and Finish: Beyond the Beat
While the high-speed beating lays the structural foundation, proper handling during the rising and finishing stages is equally crucial for your perfect loaf. After the initial beating, leave the batter in the mixing bowl, cover it lightly, and allow it to perform its first rise. Unlike gluten-rich doughs that often double in size, gluten-free batter typically won't expand quite as dramatically. However, you will observe it puffing up considerably, indicating the yeast is active and the air pockets are forming.
The batter will remain wet and incredibly sticky throughout – forget about any notion of kneading it. Its consistency will closely resemble a very thick brownie batter, rather than a traditional bread dough. When it’s time to transfer the batter to your loaf pan for the final rise, attention to detail here makes a world of difference. Carefully spoon the batter into the pan, and then take a minute or two to smooth out the top surface as much as possible. A word of caution: this dough is quite delicate. Any finger marks or bumps will remain visible after baking, so a gentle touch and a smooth finish are paramount for an aesthetically pleasing loaf. The smoother your loaf looks before the final rise, the smoother and more professional it will appear once baked.
One critical step during this transfer is to gently press down on the batter once it’s in the pan. This helps to release any trapped air bubbles. Unaddressed air bubbles can lead to unsightly holes or large air pockets in the center of your baked bread, making for an awkward sandwich experience. While these internal voids won't affect the taste or overall baking quality, eliminating them ensures a uniform crumb structure that's ideal for slicing. This meticulous approach, proven through countless trials, ensures a consistently beautiful and delicious loaf every time. For more insights into creating
Homemade Gluten-Free Bread That Slices Thin & Tastes Amazing, explore our guide.
The Payoff: A Tender, High-Rising, Sliceable Loaf
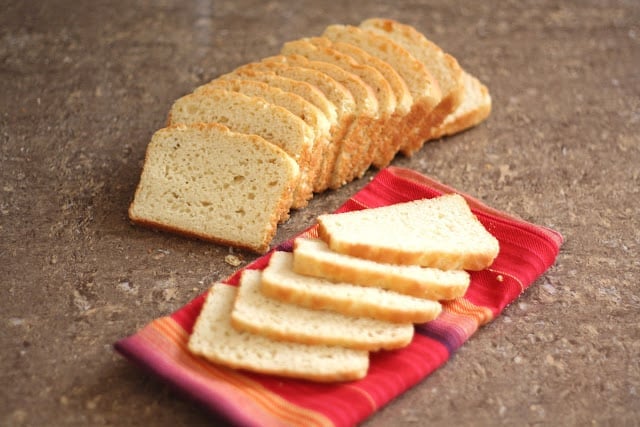
The effort invested in careful measuring, high-speed beating, and gentle handling during the rise culminates in a truly exceptional result. This method consistently yields a soft, fluffy gluten-free sandwich bread that is not only perfectly sliceable but tastes genuinely amazing. One of the most remarkable characteristics of this bread is its ability to be sliced incredibly thin – far thinner than most homemade gluten-free loaves. Many bakers report achieving 2-3 slices per inch, meaning an 8 1/2-inch loaf pan can yield upwards of 20 delicate slices.
This versatility makes it an instant family favorite. Slice it thick for hearty toast, perfect for French Toast (it cooks beautifully for recipes like Fruity French Toast), or thin for elegant sandwiches. It’s ideal for breakfast with homemade peach jam, a satisfying lunch, or even as a light dinner side. The consistent texture and fantastic flavor ensure it’s enjoyed by everyone, whether they’re gluten-free or not.
Once your perfectly baked loaf emerges from the oven, there’s one final, small step to enhance its appeal: brush the warm bread with a very small amount of melted butter. This not only adds a delicate layer of flavor but also helps to keep the crust wonderfully soft. The most crucial post-baking tip, however, is patience. Resist the urge to slice into your beautiful loaf immediately. For the best texture and clean slices, allow the bread to cool *completely* before cutting. This allows the internal structure to set fully, preventing crumbling and ensuring those thin, perfect slices you've worked so hard for.
Pro Tips for Your Best Gluten-Free Bread Yet
Achieving consistent success with this gluten-free bread recipe involves a few key practices that go beyond the basic steps:
*
Precision in Measurement: This cannot be stressed enough, especially when it comes to gluten-free flours. Unlike traditional baking where a little variance might be forgiving, gluten-free recipes often require exact proportions. Always scoop your flours into measuring cups with a spoon, then level off the top with the back of a knife. Never pack the flour or scoop directly with the measuring cup, as this can lead to too much flour and a dry, dense loaf.
*
Invest in a Good Mixer: A stand mixer with a powerful motor is highly recommended for the high-speed beating step. It ensures consistent and thorough aeration, which is vital for the bread's structure.
*
Don't Rush the Cooling: As mentioned, waiting until the bread is completely cool is essential for optimal slicing and texture. Warm gluten-free bread can be crumbly and difficult to cut neatly.
*
Embrace the Sticky Batter: It’s easy to second-guess the process when you encounter a batter that's so different from conventional dough. Trust the method; the sticky, thick consistency is exactly what you’re aiming for.
*
Visual Guidance: If you're a novice baker or new to gluten-free bread, seeking out recipes that include numerous photos of the batter at different stages can be incredibly helpful. Visual cues provide confidence that you’re on the right track. And to perfect
Your Guide to Soft & Sliceable Gluten-Free Sandwich Bread, we have further tips.
The journey to baking excellent gluten-free bread no longer needs to be fraught with disappointment. By understanding the science behind the high-speed beating technique and applying careful attention to detail throughout the process, you can consistently produce a loaf that rivals, or even surpasses, store-bought options. This method is a game-changer, transforming what was once a challenging endeavor into a rewarding culinary experience.
Conclusion
The quest for a truly delightful gluten-free bread often feels like an impossible dream, but the secret of high-speed beating unlocks a new era of delicious possibilities. By incorporating ample air into the batter, we effectively mimic the structural role of gluten, resulting in a consistently
tender high rising gluten free sandwich bread that is soft, incredibly fluffy, and perfectly sliceable. From its unique batter consistency to its delicate handling and crucial post-bake care, every step in this method contributes to a dependable and utterly amazing loaf. Say goodbye to dense, crumbly bread and embrace the joy of homemade gluten-free bread that tastes as good as it looks. Give this transformative technique a try – your taste buds, and your sandwiches, will thank you!